Thursday, December 29, 2011

Eggs a la Goldenrod - A family Tradition

This is a much requested family favorite.  I don't make it very often because it takes some time, but if you have the time, this is a must!

Eggs a la Goldenrod

For the Sauce combine:
1 lb butter melted
2 1/2-3/4 cups flour
Mix well till it looks like this.

After the rue is made, put in large stock pot with 1 gallon of milk.  
Add in 2-3 tsp pepper
1 Tbsp salt
2 tsp seasoning salt
Cook on low/medium heat stirring constantly til it thickens to desired consistency.  It takes about 20 minutes.

Boil 2 dozen eggs and cut up.  


Reserve about 1/3 to 1/2 of the yolks in a separate bowl.

Using a fork, shred the yolks to look like this.Cook 1 lb of sausage and add to the sauce. 

 Add eggs and stir to combine.


I only use this bread.  I've tried using a more whole grain bread and get vetoed every time.  It must be a thick homemade bread.  Store bought doesn't even come close to cutting it.
Toast the bread and break up into bite size pieces.
Pour egg gravy over the top, a spoonful of yolks, and a light dusting of paprika.
OOOhhh...  its heaven. 
 I promise!

Tuesday, December 27, 2011

Homemade Flour Tortillas

I got this recipe from my cousin a few years ago and I've never turned back.  Homemade tortillas are the only way to go.  Seriously!  But since I'm not an old Mexican Abuela, here's my gringo way.  Still so good and way better than store bought.

Flour Tortillas

Mix together:
4 cups flour 
(you can do a combination of white and wheat and still get excellent results.)
1 1/2 tsp salt

Cut in:
1/2 cup shortening

Mix together then add cold water 2-3 Tbsp at a time, enough to make a pilable dough.  It's about 1 cup.

Knead 8 minutes or until 
soft and stretchy.
Form dough into golfball sized balls. Place on well floured surface and cover with a dishtowel.  Let rest 30 minutes. This will make rolling them out easier.

 Now shape each ball into little discs. This helps the tortillas come out round.

Make sure the surface is well floured so they don't stick.  Turn the tortilla as needed to keep it round. Also roll from the middle out.

Cook either in a large fry pan, or your electric griddle til lightly browned.


There you go.
Homemade tortillas.
We do burritos, enchiladas, & quesadillas.
Check these out.  They are amazing!
What will you do with yours?

Saturday, December 24, 2011

Gift of Self Coupon Freebie

My family decided to do a gift of self this year as we drew names.  I designed these coupons in Photoshop and they are free to download and print.  

Just hand write what you are giving in the stamp circle.  

You can also create a scratch off space by combining silver paint and dishwashing soap, paint it on to contact paper, let dry and cut to fit the space.  So fun.
Happy Christmas to all!

Friday, December 23, 2011

DIY Jammies Anyone?

I wanted to do PJ's for Christmas for my kids this year and thought I'd try doing them myself.  Here's what I did.

I found some long sleeve t-shirts at Wal-Mart for a few dollars so I got one for each of the kiddos. I also made PJ pants out of flannel using this technique.

Then I used some craft paint and some foam stamps I got from Creating Keepsakes years ago.

 This one is for my girl.  Of course Pink is a necessity.
 Each sleeve got stamped with the year.

Boy #1 got this.  
He's a big Firefly fan 
and this is Jayne's mantra.

 Boy #2's shirt.  He's my super active one. This fit him to a T.


Boy #3's shirt.  He's such a ham.  This was perfect for him.


 My baby boy is getting this one.  The circle says Origional.  Perfect.

Thursday, December 22, 2011

Twisted Ribbon Necklace Tutorial

I found something similar on Pinterest. But I decided to change it up a little.  This project was so easy and quick.  It made a perfect Christmas Present for my Sister-In-Law.  I loved it so much, I had to make one for me too.

Here's the supplies:
 Two Spools of ribbon.  I used satin and unwired sheer about the same size.
A string of beads.  I used one string per necklace. Try to keep the ribbon and the beads approximately the same size.
Upolstery thread or embroidery floss. 
Large needle and scissors.

 I cut the two strands about 40 inches long.
 Un-string the beads and double the thread.  Tie a knot at the end.
Cross the ribbon in the middle of the 2 strands like this.  Double stitch in the end as shown.

 Start threading the beads. After each bead bring two pieces of ribbon up and over and stitch in place.  I twisted the satin ribbon each time to keep the shiny side out.

After 2 beads, stitch back through one bead to hold it together better.


I did that 3 times. 
Front, middle and end.

 It will start to look like this.


 Use all the beads.
 At the end stitch back and forth a few times to secure the end and knot the thread.  Cut off long ends of thread.

Tie a knot in the end of the ribbons to hide the thread.
Hold the necklace up and decide how low you want the beads to sit.  Cut another length of satin ribbon to finish the necklace, long enough to double it.  Poke the ribbon through the starting point and pull ribbon through to the middle.

 Tie a knot in the added ribbon like this to secure.
 Tie a double knot in the ends of the ribbons and you're done!

So lovely, easy and quick! Can't wait to wear it!

Wednesday, December 21, 2011

Cowboy Cookies

I got this recipe from my Aunt Donna.  She was an amazing baker.  I hope to match her abilities someday.  Here's a favorite recipe from her.

Cowboy Cookies

Cream together:
1 cup melted butter
2 cups sugar
1 Tbsp Molasses

Then add:
2 eggs mixing well

In another bowl combine:
2 cups flour
1/2 tsp baking powder
1 tsp baking soda
1/2 tsp salt

Mix together and add to butter/sugar mixture.  Then add:

2 cups regular oatmeal
1 cup chopped nuts
1 cup chocolate chips

Mix well and drop spoonfulls on parchment paper.  Bake at 350 degrees on stone for about 11 minutes or lightly browned.
Cool slightly on baking racks.

 Of course the kids love to help!

Country Christmas music playing in the background.  So Perfect!

Tuesday, December 20, 2011

Christmas Wreath

Here's my Christmas Wreath.  I use the same grapevine  base and change out the dressings.  This time I added burlap rosettes, holly berries, a large ribbon and the C in the center.
My husband asked if it was for our last name or for Christmas.  I said you decide.

Here's how I made the C.


I've been saving my dryer sheets for about a month.  Here's the stack.

 Then I cut them in half and then in circles.
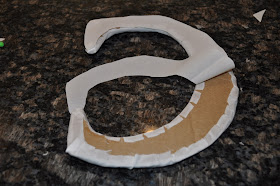
 Next cut two letters out of cardboard.
 I cut some white fabric to wrap around the cardboard and hot glued it in place.
 Then cut a smaller piece to cover the other side.  Glue down.

 I used the end of my paper piercer to shape the flowers.  Place in the center of the flower and pull the sides around the tool. Add a dab of hot glue and place on the letter. I did these rather loosely.  It just depends on how full you want the letter and how much dryer sheets you have.

 Here it is finished.  It does smell good too by the way.


 Welcome home!

Monday, December 19, 2011

A Little Homemade Christmas

I wanted to share a little of my Homemade Christmas.

This first one is a Nativity Puzzle I made.  The cow was MIA when I took this pic.


Simple and Sweet.

 I found the pattern for this set years ago.  It took a long time to paint each one, but since it's wood the kids can play with them all they want.


 This is the advent calendar I made.  You can see the origional posts here and here.

A quilted Tree Skirt.


 A Log Cabin Wreath Table Topper.
Last but not least, my quilted stockings.
 I chose a few different block patterns.  Then made enough blocks to make the stocking shape and added some decorative top stitching.  Then assembled the stocking, added a cuff and a loop for hanging.  I also embroidered each persons name on the cuff.


 Happy Christmas to All!