Showing posts with label Sewing tutorial. Show all posts

Wednesday, October 23, 2013

Babylonian Boy's Costume for under $10


Here's the Boy Version of a Babylonian Costume.
You can go back to the Girl version here.

Basically it is just a simple wrap skirt with some fringe.
Easy peasy.

Here's my design inspiration.
I really liked the fringe that graduates down the skirt.
It definitely needed something over the shoulder so rather than making a tunic,
I just added a sash similar to the Boy Scout Sash they put their Merit Badges on.
I just cut fringe instead of a solid sash.


Here's the simple wrap skirt pattern.


You can tell I didn't curve the top and bottom on the pattern when I cut it out.
That was a mistake on my part and I curved the edges later in the process.
Just follow the pattern above and you will be fine.


Again I'm using Freezer paper for my pattern.
Just use what you have and mark your measurements on the paper to create the pattern.

I'm using a beautiful Burgundy sheet I picked up at Goodwill for a few dollars.

You will need the Waist, Hip, and Length measurements for this costume.


Cut 3 of the skirt pieces.
I'm cutting them on the fold, but you can lay the pattern out flat and cut.
Whichever is easier for you.

For the front piece I cut a gradual swoop up one side of the front piece.
This will be the front of the skirt with the fringe trim.
Discard the excess or save it for another project.


For this costume I needed the 6 inch strips of bias tape cut
from the gold sheet.


I didn't take a picture of this step, but sew right sides together with the 3 skirt pieces.
It should be one long continuous piece.
I top stitched each side seam to finish and secure the seams.

On the straight side of the skirt, do a simple rolled hem.
The rest will have the gold trim on it.


Cut one piece of Red fabric about 3 inches wide, 
1 3/4 times as long as the waist measurement 
and press into bias tape.
Find the center of the strip and pin to the center back of the skirt.
Sew on bias tape finishing the excess into ties.
This will be how you put on the skirt.
I like this method because it's really forgiving 
and makes this pattern semi-adjustable
for different sized people.

Now for the trim.
This is going to be a little weird, 
but it will make a nice finish to the bottom edge without
doing a rolled hem.

On the skirt piece, right side facing up,
press a 1/2 inch up from the bottom like shown all the way around the bottom edge.


Now take your gold fabric and on the wrong side fold up 1/2 inch and press like shown.


This is kind of tricky but simple.
Tuck the folded edge of the gold inside the fold of the red like shown.
Pin in place.
Continue all the way around the bottom edge of the skirt 
including the gradual curve in the front.


Top stitch where the two fabrics meet on the gold fabric.
I did a double seam.

Now for the sashing.
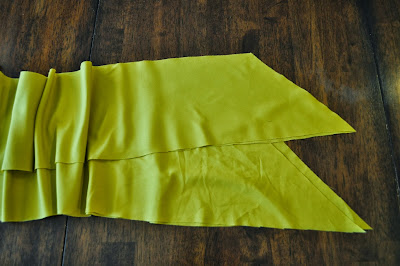
Get two long pieces of 6 inch bias fabric of the gold.
Put right sides together.


Seam on one side like shown.


Fold over, wrong sides together and press, 
then top stitch where the seam side is.
I added a double seam.

Use scissors to cut fringe.
Mine are strips about 1 inch apart all the way around.


We just draped the sash across my boy 
and safety-pinned it to the waistband of the skirt.

Done.


If you look close you can see the ties we created at the waist to hold the skirt in place.


The sash is just pinned in place.  
I made the sash extra long so it is fully adjustable 
and adds extra trim to the costume.


Thank you my Babylonian Warrior!
Happy Halloween!


Tuesday, October 22, 2013

Girl's Babylonian Costume for under $10

This cute girl is my neighbor and she was gracious enough to be my model for this costume.
I was asked to come up with a Babylonian costume for an upcoming event.
It needed to be simple construction but still convey the period effectively.
After much scouring the internet for ideas, I settled on this image.


Technically it was ancient Greek, but I didn't really like the whole drapey look of the Ancient Babylonian.


Too non-descript for my taste.
I had to make a boy version also.
I will post that one tomorrow.
These are super easy to make and you can customize the pattern to fit yourself, 
or your kids, or whomever.

You will need the following measurements from your subject:
Elbow to Elbow.  Have them stand with their arms straight out to the side like a cross.
Top of Shoulder to Hip.
Top of Shoulder to Top of Shoulder (this is for the neck opening)
Bust
Waist
Hip
Waist to knee or desired length.

That's it.
Here's the patterns:

I made them on a 8 1/2 by 11 size of paper so it's easy to save and print.
I'm using a beautiful jewel toned purple sheet I picked up at Goodwill for a few dollars.
I also picked up a Gold sheet as well for the trim.
I didn't use all the material from the sheets so you will have extra material for another project or another costume.

I wrote the pattern out on 2 pieces of freezer paper.  
Any paper would work.

Butcher paper. 
Computer paper. 
Packing paper. 
Newspaper. 
Use whatever you have.

Mark all the cutting lines using the measurements you took from your subject as shown.


I'm using my quilting marking pen to mark the side seams that are under the arm.


Find your center of the pattern and mark the top of the shoulder to shoulder measurement,
then mark the fabric so you know where to do the shoulder seams.


For the gold fabric, I folded it in a large triangle, then cut bias tape in varying widths.
You will need some 2 inch and 4 inch width strips.
This shows the 6 inch strips but those are for the boy costume you'll get tomorrow.


Cut out your fabric using your patterns, both the top and the skirt.
You will need two pieces of fabric for each.

Let's do the skirt first.

Put right sides together and sew up the side seams.
Rather than serging or zig-zag-ing the edges, I just flipped the fabric over
and topstitched the seam in place to secure.


For the waistband, rather than cutting an additional strip for the waist, I notched the front center
like shown.
This will be the opening for the drawstring.
It will also save you from having to do a button-hole for the opening.

Cut a line in the center front, then fold the fabric back and topstitch to finish the edge.


Fold over the top edge of the waist and pin in place.
Stitch to create a casing for the drawstring.


I used the cut off selvage to make the drawstring.
Use a safety pin to thread the drawstring through the waist band casing.


Now with your 2 inch gold strips, join them together to make a continuous strip so you don't have to worry about running out at the last second.

The nice way is to join the strips like shown.


But you can do a straight seam as well.
Option: 
Iron the bias tape before sewing to edges of fabric.
I didn't when I first started, but it sure helps keep the fabric nice and flat
as you attach the bias tape.

Add a strip of bias tape to the bottom edge of the skirt as trim and to finish the edge.
The skirt is done.

Now for the top.


Do a rolled hem to the top edge of both rectangles of the Shirt.
Then add the bias tape trim to the remaining 3 sides like shown.


Mark your neck opening.


You will need to press 2 strips of 10-12 inch length pieces of fabric 
for the top of the shoulders like shown.


Lay the two rectangles right side up with the top seams matched up.
Pin the pressed strips in place like shown.
This will attach to top of the shoulder.


This is what it looks like full size.


With the fabric pinned in place, stitch around the gold rectangle like shown.
The tops of the shoulder is done.


Now for the side seams.
I wanted a way to add a belt to the top with out loosing the drape of the sleeve.

The easy way is to sew up the side seams.
Put right sides together and mark where the stitch line needs to be.

You will be sewing up, across about 1/2 inch, and back down parallel to the first seam.


 It will look like this.


Carefully clip between the two stitch lines.
Turn right side out and top stitch the seams to secure and finish.


Now for the tie at the waist.  I just roll hemmed the edges and pressed.
Done.


Here's the finished costume on this cute girl!
We added a gold necklace.
I wanted to add some kind of head piece but I haven't decided what to do for that.


I love the flow-y sleeves that are just attached at the shoulder.


Happy Halloween!


Print It Button