Showing posts with label Thanksgiving. Show all posts

Tuesday, November 20, 2012

Rolls and Pies. Oh Yeah!


It's that time of year again, and once again my assignment is rolls and pies.
I don't mind one bit.
I love baking!


I just wanted to share what I'll be making tomorrow in preparation for the Big Feast on Thursday.


We are actually going to both sides of the family so I get to do double duty on my share of the fixin's.

This first one is hands down, my husband's favorite.

As long as there are Orange rolls and ham, he's happy.


1.  Whole Grain Orange Rolls


2.  Strawberry Rhubarb Pie


3. Apple Pie


4. Dinner Rolls

Plus this year I'm going to add a Fabulous Coconut Creme Pie, and a Pumpkin Pie.

I will definitely share.

But of the 4 already pictured which one has your mouth watering?

Rolls... pie... ???

As we say in my family, "I"ll have a little bit of each!"

Monday, November 19, 2012

A Scrapy Turkey Lurkey


I finally got my little Turkey Lurkey finished.

I knew I had posted the pattern for this cute little guy a while ago but when I went back through my blog post list, I realized it was in 2009 that I originally posted the pattern.

2009.
I can't believe it.

You can see it here.

Well he's finally done.

I used several of my scraps to make the feathers, and added some fun elements to the finished project.

Let me show you.
 Here's a close-up of his face.  I used some small black buttons for his eyes, and a soda pop tab for the buckle on his hat band.  Each of the pieces were ironed on with interfacing, then hand stitched in place.  You could also easily use a sharpie to get a similar look.

Here's his scrawny Turkey legs, hand stitched.


I used the remaining scraps to make the binding around the edges.

There is a dowel at the top to keep him flat and some scrap burlap for the ties.

Turkey Lurkey says,
Happy Thanksgiving to you!

Be sure to stop back tomorrow.  I'll be sharing what I'm making for Thanksgiving. ;)

Wednesday, November 14, 2012

Thanksgiving Tablescape

It's that time of year again.  I love the holidays and all the beautiful earthy colors.  Of course Red is my favorite, but it also looks fabulous with oranges, yellows and greens too.  I just wish Arizona had 4 seasons.  I really love seeing the leaves change color.  I guess it will just make trips to the mountians more spectacular.
I wanted to create a pretty table centerpiece this year and I think it turned out beautiful.

I made the black cupcake stand.  It's made from particle board, cut and routered, some wooden knobs for the feet, two old chair rungs for the supports and an a finial for the top.

The inside has gourds, pumpkins, squash, a candle, berries, and silk flowers.


 I made the table runner out of burlap.  I just cut some strips, wove them together, and sewed them in place.  
Simple and rustic.

Lay out the burlap and decide the width of the strips.  Pull one string out like shown.  This will give you straight lines for the strips.


Cut along the lines created.
Start weaving the strips, starting with one corner.
Pin strips in place to hold.
Keep adding strips alternating sides and weaving them in place.
Use pins to hold them.

When you have the size you want, stitch along the outside first.  I did two lines on either side of the outer strip.
Then one center line down each inner strip to hold the whole thing together.


You can see my Gratitude board in the background.


  Happy Thanksgiving!

Thursday, November 1, 2012

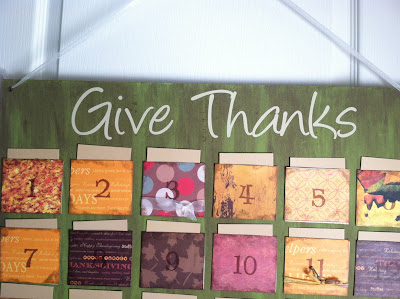
Thanksgiving Advent Calendar

 I can't believe it's November already.  Luckily I had this almost finished before the month began.  Just a few finishing touches and it's ready to go.  My sister {R} had the idea and put the supplies together for me.  She even ordered the little library card holders for each pocket.

I love how it turned out.


The board is just a piece of cheap MDF.  I gave it a light wash of green, and added the vinyl lettering.

I covered the pockets with some Thanksgiving paper from my stash, then stamped the numbers with my Technique Tuesday rubber stamps.

The cards for the pockets were cut from cardstock, then stamped with stamps from My Sentiments Excactly.

I thought about adding a ribbon to the top of each card, but decided against it.

The pockets were adhered to the board with a glue gun.


Some of the pockets got a little ribbon trim for added dimention.  I love being random!


The plan is for each family member to take a day and write what they are thankful for.  I will keep them and get them out next year, possibly making a Scrapbook page from the cards.  If I do, I will definitely share.

Here's to a whole month of Gratitude!

Wednesday, November 16, 2011

Thanksgiving Banner


I finally finished my Thanksgiving decor just in time and I wanted to share.

I found these great vintage Thanksgiving art at The Graphics Fairy. There are so many great things there.  I picked out my favorite ones, resized them in photoshop to fit my frames and printed them out.
Here's the right and left sides of my kitchen window.


Now for the banner.  I cut the shapes on my cricut, Storybook font.  Then inked the edges of the top letter and the brown base.  Then I used Stickles to add the glitter to the right edge of each letter.
 Next I followed the paper folding tutorial from Little Birdie Secrets found here.  (I got to go to that party with Jessica and Mandy.  I so miss them!)
Then I pulled apart a silk flower and put a brad through the center, gluing the whole thing together and punched holes in the corners of each letter.

 For the string to connect them, I used this, picked 3-4 strands and wrapped tape around the end for easy threading. Kinda like a shoelace.


 Here's a close up of part of the banner.
 Here it is finished.  So warm and festive!

Saturday, October 10, 2009

Thanksgiving advent calendar

Ok, so my life is super crazy right now and I probably won't get this made in time, and I know you are itching to get yours done, I decided to post the patterns for the Thanksgiving Advent calendar. I cut out the pieces from construction paper so you can see what it will look like. The turkey looks like this:
The pumpkin is the same pattern you used in the halloween calendar:

Here are the templates:

Now for the finished banner.
Super cute and easy!


You can see the full tutorial here.

This is what I made for my sister for her baby shower:


This is the card that went with the baby book. Just take a silk flower apart, and attach to card with a brad.


Happy Crafting!

Print It Button