Showing posts with label Burlap. Show all posts

Wednesday, August 21, 2013

Wall Art Week - Part 1


I have been working on stuff lately, just not getting around to posting about it. 
Sorry about that.

So I've been commissioned.

What?

Well I posted a couple of my birds and burlap and pallet wood pieces on a local Facebook group.  One of the ladies on their found me and asked if I would want to put some of my pieces in her store.

Um.. YES!

So now I finally get to play and make a little cash to support my crafting addiction.
Totally a WIN - WIN!

So I thought I'd try doing a little chevron and burlap combination.
It turned out to be way easier than I originally imagined, especially since 
I am extremely math challenged.

So let me show you how I put this little beauty together.

First I covered a few pieces of particle board with burlap and stapled them in place.


Next I pulled out a piece of contact paper.
I'm beginning to really love this stuff.
There are so many ways you can use it.
Today was just one fabulous example.


So I knew there are the little squares on the backing of the Contact paper.
This would greatly help my math challenged brain to make perfect chevrons.
Well almost.
There aren't the squares all over the backing, they take it out for the instructions.
Darn.
So as you can see by my lines I muffed it up a few times trying to get them even and straight.
That's ok.
You don't need the backing really anyway.
After I was happy with the chevrons, I cut them out.


Next I laid them on the burlap and gently pressed them in place.


Here's a close-up.


They are long enough to wrap around the board which was exactly what I wanted.


While strolling through my local Lowe's I found this little tub of paint sample.
$1.25.  Sold!


Now just use a sponge brush and pounce the paint on.


Keep going, moving the contact paper further down as you work.
This contact paper worked for at least 3 boards.
I love it when stuff is re-usable!


After a few hours in the hot AZ sun to dry, I created this word graphic. 
I added the word graphic with my projector and a sharpie.
Easy peasy.  Just like the one I made here.


I love how it turned out.
Happy Crafting!

Monday, September 17, 2012

Projectors and Burlap part 2


I finally finished my Burlap wall project.  It took a little while to assemble all the things I used in this collection, but it's done and I love it. And I only spent $5 on the shelf.  Everything else I already had, or made.  Here's the original post where I made the clock pieces.
After it was all done, my husband said it looks like something from a magazine.  Sigh.

Here's the original Clock face I got from Graphics Fairy.
I combined her Clock face and Chocolate lable to create this combination.
Next I used the paper method I learned from Pottery Barn to decide where the elements would go.  You can watch the how-to video here. I also marked where the studs were with the pink post-its.  

I made these 5x7 graphics to go in my little black IKEA frames I had painted years ago.  It was time to dig them out and give them a new life.  The lyrics are from our song, Bless the Broken Road by Rascal Flatts.  I used Jellyka Western Princess font.  The keys came from Graphics Fairy and I added a script brush for the background in Photoshop.  Just a little more vintage to the look.  Then I printed them out on gray cardstock and cut them to fit my frames.  I really love how they turned out.              
I needed a pretty knob for my sign so I made one out of a large head nail, glue dots and a vintage button I found in my button stash.  Super easy to put together.  Hammer the nail in place and add glue dot to the nail head.  Then firmly press button in place and you're done.  Super easy and totally customize-able!


Here's a close-up of the knob in place.


 Here's the overall view.  Now for the elements.


Vintage Keys.


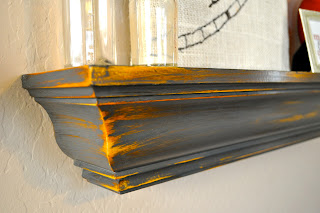
Here's the Pottery Barn Shelf I got at a thrift store for $5 and refinished using vaseline and paint with some heavy distressing.  
I super-love how it turned out!


This is actually cardboard and some ripped up sheets.  I followed a similar method to when I made my Fabric Wreath.  Only this time I just glued the ruffles in a circle spiralling to the center.  I cut out the C from some scrap beadboard, painted it white, and stained it with ebony stain.  The top is a vintage button with a plastic drapery circle to use for hanging all sewn together.


Last was this board that I cut, routered, and attached some clearance votive holders with cording. Then I filled them with some large cream colored silk flowers.


Here's a close-up of just the burlap clock.  I added some vintage apothecary jars, a tiny frame and a large red vase to the ledge to finish the look.


And done.   So pretty!

Monday, August 27, 2012

Projectors and burlap

I've been pondering more Projector projects since I still have my mom's Projector.  I did this project literally in about 40 minutes, and that included set up and clean up.  I still haven't hung them up yet.  I need some more pieces to complete the wall art but here's a quick project that turned out beautiful!

All you need is some burlap, a board, a staple gun and some sharpie markers.

 Cut the burlap to be about 2 inches larger on each side of the board so you can wrap it.

 I started with the centers and stapled the burlap down, folding under the raw edge.
Continue working around the edges pulling the burlap tight and stapling in place.  I had to use my hammer to help the staples lay flush to the board.

For the corners, I cut the burlap diagonally as shown to get rid of some of the bulk so the corner would fold properly and lay flat.

 Here's a close-up of the corner.
 Next I set up my projector and board.  I used a step stool to keep the board upright.  I had to add some extra boards underneath my burlap one to make sure the height was right for the image from the projector.
Adjust the location and focus of the image to fit your burlap.
Get out your sharpies and start tracing.

I merged two images I got from The Grapic's Fairy in Photoshop.  I loved the French Chocolate word art plus the clock face.  I plan to use the same image on a side table in the near future.


Here's the image before tracing.


And finished.  I'll definitely post them when I have them hung.


Print It Button