Thursday, December 24, 2009

Yummy Festive drink

Have you ever heard of Italian Creme Soda? I hadn't until about 2 weeks ago. I'm so glad we moved so I could find out about this super yummy drink!
Here's your ingredients:


You need Half & Half, although I've heard you can use Coffee Creamer instead, Club Soda or Sprite, and this great syrup flavoring. I got mine at Costco Business. If you are lucky enough to have one within driving distance you have to go. Since I now live in the land of Coffee, they have a whole isle dedicated to these yummy syrups. The fruit flavored ones are a must for Italian Creme Soda. They have other yummy flavors too like Peanut Butter, Caramel, Toasted Marshmallow, and Butterscotch. I wouldn't use these in the Creme soda, but they are perfect for Hot Chocolate. Mmmm.....

Any way, put crushed ice in your glasses. I filled mine about half way.


Now the fun part:
2 oz or 1/4 cup Half and Half
2 oz or 1/4 cup Flavored syrup of your choice
Pour into glass
Fill the glass the rest of the way up with the Club Soda and stir a little
Top with a little (or big) swirl of whipped cream
Did you notice how I started off with more glasses? My family grabbed them before I got a chance to take a group photo.
Make sure you have plenty of ingredients. Plus you will want to try all the great flavors available. Trust me!
These are seriously addictive! (well not in a bad way anyway.)
Too bad it's still morning. I think I need another one. Oh yeah. Hot chocolate and Caramel syrup. I gotta go!

Monday, December 14, 2009

Finished Christmas Advent Calendar

I finally finished my advent calendar a few days after the start of December. But that's OK because it's done and I love it! Here's a few pics.
I added fleece behind the buttons on Santa's hat to give them more dimention. The pockets had their numbers hand stitched on, then I played with the decorative stitches on my sewing machine on each pocket.
A close up of the hand stitched title.There is the finished wall hanging. I put a rod pocket at the top so I could hang it up with a dowel I got at Michaels. Then I put the little candy canes in each pocket for each child to choose as we count down the days.
Merry Christmas!

Tuesday, November 10, 2009

Santa's comin' advent Calendar

Since we just moved, most of my crafty stuff is still in boxes. (sniff, sniff) But yesterday I found the pattern book I was looking for. I saw this book and that is what started my advent calendar quest. It's called Santa's Comming: Art to Heart by Nancy Halvorsen. She has some great Santa designs, and I decided to do my own version of one of them. Since I just barely found some of my scrapbook paper, I made one just in paper, and will soon get one done out of fabric. Here's what Santa will look like:


Here's the patterns, they are all made to be printed out as an 8.5 x 11 from your standard printer.


Right click on each pattern, and hit Save As.


For the instructions on how to put this together, see my Halloween advent calendar post.


One more close-up look on Santa's cute face:

  Here's Santa finished.  You can see the rest of the tutorial here.
Happy crafting!


Friday, November 6, 2009

Quick Christmas Card Tutorial

Ok. I got my Creating Keepsakes magazine in the mail yesterday. I know you probably have had yours for a while and dog-eared a bunch of pages, but I saw a little Christmas tree embellishment on one of the pages and wondered if I could duplicate it in Photoshop. I think mine turned out pretty good. Here's the finished card.
So here is how I did it:
1. Open a new blank document. I made my 4x6 with a white background. Click on your custom shape tool. I chose the arrow shape that kind of looks like a tree. Make sure your color pallet is set to black. Click and drag the shape on your document. Use the Transform tool to resize your 'tree'.
Mine looks like this: Once that is done Left click on the layer and select >Simplify Layer in Elements and >Rasterize Layer in Photoshop CS2,3,4.

2. Open a new blank document, but make sure the background is Transparent. Choose a brush from your brushes pallet. I chose a couple of swirly ones I got from brusheezy. They have a ton and they are Free. Use the Transform tool to resize and rotate the brushes until they look like what you want. Here's mine:Be sure to 'stamp' each brush on it's own layer so you can move them independently. Once you like the shape, hit Control and click on each layer to select all of them. Then Left click and select Merge Layers.

3. Use the paint bucket tool, change the color pallet to white, and click on the shape to fill it with white. Then drag your shape on to the main document with the black tree shape.

4. Now open your cute patterned papers and select a background paper and a paper for the tree. I chose from OScraps Moonrise collection. Sorry but they don't have it on their site right now. But I bet you have a ton of cute paper you are just itching to use. I chose a stripe for the background. Drag it to a layer below the tree layer.

Do the same with your tree paper.

5. Remember when you used the clipping mask? Hover your mouse between the tree shape layer and the tree paper layer, hit the Alt key, and click. This will magically clip the tree paper to the tree shape.

6. Now select the tree shape layer. Go to your Blending Options, or the circle-f key below your layers pallet. Choose Inner Shadow. Play with the settings until you get the look you want. Mind kind of looks like the edges have been inked.

7. Next select the swirly shape layer. Again go to Blending Options. I chose Bevel and Emboss, and Drop Shadow. It looks like this: I also used the clipping mask technique to 'clip' the swirly shape to the tree shape so there wasn't any extra swirls hanging off the edges.

8. Open a new layer and select the custom shape tool again. This time choose a rectangle to make the trunk of your tree. Click and drag your rectangle, making sure the layer is under the tree shape layer. Clip some brown paper to the rectangle using the Alt key again, just like you did with the tree shape. I added the Inner Shadow to the tree trunk shape too.


But the stripe is a little too much for me. I don't love it. So this is the cool part of Digi scrapping. I can just drag the stripe layer into the trash. No fuss, no muss, and I didn't waste any expensive paper. I chose another calmer green paper from the same collection for the background. Drag it under your tree to look like this:

That's better.


9. Now select the tree shape and hit Control+J to create a duplicate layer. I think Elements is a different letter. Check your hot key list to get the right one. Drag it over and resize it using the Transform tool. Do the same thing as with the first tree. Clip a different paper to it with the Alt key. I used Jessica Spragues Home Away From Home collection. It's a great kit and it's also Free! Drag another tree trunk over to the new tree, and follow the same instructions for adding an inner shadow, and clipping paper to the shape.


10. Finally I used the Rectangular Marquee tool to create the text strips at the top of the card. Click and drag your shape, fill it with color, and add a drop shadow. You can separately create 2 of them, or just duplicate the one you created. Then I added 2 lines of text using the Text tool. I use my favorite font: freebooter script. Add a drop shadow or bevel and emboss, and you're done!
Have fun playing with your digi stuff, and the best part is you can use it again, and again, and again, and again, and again INFINITY!


Thursday, November 5, 2009

East Coast Experiences

Here are the rest of the pictures I wanted to post of our trip.


Ok. So these aren't really scenic, but it's a great story. My little girl got a Godzilla stuffed animal from the Empire State building as her souvenir. Since we couldn't make it to the State of Liberty ferry (6 hour wait) we decided to take the water taxi that goes around Manhattan. While we were waiting in line, along with a ton of Chinese people I might add, my girl accidently drops her little Godzilla in the Hudson river. I should have taken a picture of it in the river, but she was screaming too much and I was trying to calm her down. There was a fairly swift current that took little Godzilla across the river to the next pier. My husband and oldest son ran around to the other pier and just barely fished Godzilla out of the river, thanks to a plank of wood nearby. I'm totally surprized it didn't sink, especially since it was wearing the bracelet that her Aunt Jo gave to her. (She still wears it all the time by the way.) Anyway we got Godzilla back, and not with out some happy cheers from the Chinese people too. It did smell funny and we had to wash it before we could let her play with it. Definitely a memorable experience.

Times Square, NYC


The Staton Island Bridge, that was actually constructed and finished by a woman. Very Cool!

Milton Hershey's home in Hershey, Pennsylvania. He was an amazing man. He went bankrupt 6 times before finally making it with his Milk Chocolate. He never had children so along with his wife, they started a school for underpriveledged boys. The school still runs today, and now accepts girls too. It is for K-12 grades, the students live in houses on campus with house parents, and each house has Chocolate Milk on tap. Upon graduation, each student gets a full wardrobe, luggage, cash, and an $80,000 scolarship to any college they choose. Since Mr. Hershey didn't have an Heir to leave his fortune to, it all went to the school. So now, whenever you buy Hershey chocolate, a part of that money goes to the school to help underpriveledged children get an education. Amazing! Kind of makes me want to go buy some Chocolate, well to eat it too.

Philadelphia, PA where the Declaration of Independence was written and signed.

Just the trees next to the Parking Lot at the Temple.

The Washington DC Temple.


The Washington Monument in Washington DC


The Bridge to Arlington Cemetary at Dusk from the Lincoln Memorial.
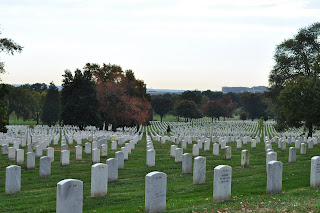
Arlington Cemetary
The view of the US Capitol Dome from inside the Capitol Building.
The inside of the US Capitol Dome.
The US Capitol

A chandelier in the Capitol Building.


One of the Rooms inside of the Capitol Building.


The White House


I think the Library of Congress was the most ornate building I have ever seen.
The Potomac River with the Jefferson Memorial to the Left.


The Jefferson Memorial


The Lincoln Memorial
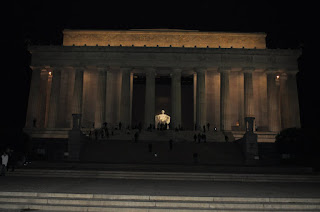
I think I will finish with the Lincoln Memorial. It really is much bigger than you think it is. While we were standing there, I wondered what President Lincoln would think of our country today. Has it become what he envisioned for us? Have we honored his legacy properly? Are we really grateful for the freedoms we enjoy? As we walked around the Capitol, I was amazed at the workmanship of that building. Did you know that President Lincoln ordered the Dome to be finished during the Civil War as a hopes to unite the country that at the time was divided? I think that although he was a mortal man, he was also a wise visionary. May we each be grateful for the country we have been blessed with, and may we each do our part to preserve what our forefathers sacrificed so much to give us.

Wednesday, November 4, 2009

Amazing Places I've been

I had to share some pictures of some amazing places that I have been recently. Plus since my 2yr old dropped my camera in Kool-Aid, I got to buy a new camera. It's a Nikon D5000. I'm still a newbie at digital SLR cameras but I think the pics turned out great. All are on the east coast. I will try to label them as we go.

Niagra Falls


The Smith Farm in Palmyra, NY


The Sacred Grove


The Palmyra Temple


The view from the Top of Hill Cumorah.


These were taken at a cemetary in Boston, Mass. Paul Revere, John Hancock, and Mother Goose are all buried here. I saw the pennies and asked someone what the significance was. I was told it is a Jewish custom. I need to research that more. Very interesting.
The USS Constitution, or Old Iron Sides. The oldest still seafaring comssisioned vessel in the US Navy.

The monument at Bunker Hill, Boston, Mass. Similar yet not near as big as the Washington Monument in DC.
Manhattan Island, New York City, New York from the Empire State building. (I'm so glad I don't live in a city like that.)
The National Museum of Natural History in NYC. You know, the one from the movie Night at the Museum. Unfortunately it is nothing like the movie on the inside. Rexy isn't even there. I was so sad.


I was amazed at how mesmerizing the Stature of Liberty was. I couldn't stop staring at that amazing monument that has greeted so many millions of immigrants to this country, probably some of my own ancestors too.


Mmmm. Chocolate. This is at the M & M's World Factory at
Times Square in NYC.
Well that's a good place to stop for now. I took over 1000 pictures on this trip. My husband kept saying 'there goes the crazy lady with the camera.' It was fun, quick, exhausting, and a great education. I learned to appreciate things I never even thought of before.
Enjoy!

Print It Button