Showing posts with label Easter. Show all posts

Monday, March 25, 2013

DIY Mod Podge and more Easter stuff!

If you read my blog with any kind of regularity, 
you will already know that I'm a "From Scratch" kind of girl.  
Especially when it comes to food.  
I rarely buy pre-made anything.  
Mostly because it's horrible for you, but also because I want to know everything that goes in to what I make. 
Plus it's much cheaper that way.

I've wanted to make my own mod podge and when I've searched for a recipe, 
it's ALWAYS - ALWAYS Elmers glue and water.  
Well I wanted something that I could make with ingredients I already had on hand.
It's a simple project, I just need item A to stick to item B.  
No glossy finish.  
Simple.

So here's the recipe:

3 parts Flour
1 parts Sugar
3-4 parts water {to desired consistency}
Whisk these together and cook over medium low heat until thickened.


Remove from heat and add 1 tsp white vinegar.  Stir.
Let cool before using.
Store in airtight container in the Fridge for up to 1 week.


Easy. And no Elmers to be found.


I've loved these book page eggs I've seen all over pinterest.  
So for just pennys I made some of my own.
The bag of eggs was like $1.75 at Walmart.  
I only used a couple of eggs.  
Plenty of eggs left for the hunts this week.  
I also am using more of the pages from the book I ripped up for the last project.  
And of course my homemade glue.  
Just cut the paper to just barely cover the egg, brush plenty of glue all over the egg and attach the book page, smoothing out any bubbles in the paper. 
It's really messy and I did not want to touch my camera with glue-y hands 
so no pics of the actual covering the egg part.  

It's easy though, just messy.
Let dry completely.


This is my tablescape now. 
The banner is one I shared last year.
The pots were on clearance at Joanns and I cut some vinyl using the 
Storybook font on my Cricut to make the numbers on the smaller pots.


The filler is just yellow paper that I ran through my paper shredder just like I did here.  
None of that nasty plastic grass for me!


Happy Easter!

Update June 2014:
It's been a year and there isn't any fading or browning of the eggs.  They still look as good as the day I made them.

Friday, March 22, 2013

A Scrapy Easter Bunting


It's Easter time and time to get decorating.  
I'm so loving the spring colors right now.  
And this project was quick and easy to put together.  

I dug through my fabric stash to find these super cute pieces.  
There is cotton, seersucker, flannel, fleece, and chenille.  
It's a great random sampling of colors and textures.

First I cut out an egg shape with paper to be my pattern, 
then started cutting eggs out of the fabric.  
I also cut rectangles of burlap for the bunting.


The first project is for my kitchen window frames.  
I change them out seasonally and it's time for the Easter version.

I ripped up an old book and used the pages for the backgound.  
I just taped the pieces to a sheet of paper that fits the frame.  
Then trimmed the excess off.


Each one gets a single egg.  
I varied the colors and textures of the eggs on the wall.


Here's the finished frames.  
There are 3 frames on either side of the window.

Easy and done!


Now for the bunting. 
I took each egg and sewed around the edge to attach them to the burlap, 
then added a ribbon to the top to string them together.


Simple. Cute.
Happy Easter!


I will have some more Easter decor and recipes coming soon!


Monday, April 9, 2012

Easter

Here's a quick and belated Easter Post.
 This is my Easter Banner.  I cut egg shapes out of scrapbook paper and pasted it to Cardstock to give it sturdyness.
 I made some Chicks and a Bunny too.
 Then I tied each piece together with ribbon.
 A few more views.
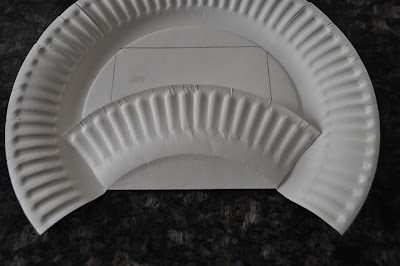
 Now for the Basket.  Super easy and cheap.  A stack of 100 plates was less than $2 at Walmart.  I'll be good for baskets for a long time.  It needs to be the regular old paper ones.
 Cut a 4 inch square out of paper for a template.
 Center the square and lightly trace around the square.  These will be your fold lines.
 Now cut from the edge of the paper plate to the corner of the square you drew.
 Fold up on the fold line and press.  You can use a bone folder here or just your fingernail to get a nice firm crease.
 Now fold in the corners like shown.
 Continue all the way around.
 With your glue stick glue the corners to each other to form the basket.
 Finished.
 Now fill and decorate.  I just tied some cute ribbon around the basket, but scrapbook paper would be very cute too.  Be as detailed and creative as you want to be.
 I used my paper shredder and some green printer paper to make the grass.  I really hate the plastic grass they sell at the store.  It gets everywhere.  This way when they are done it all goes into Recycle.

Happy Easter!

Tuesday, April 5, 2011

Easter Breakfast Casserole

My family loves this breakfast casserole. It would be perfect for Easter Brunch, or a Tuesday morning during Spring Break. Either works.

Breakfast Casserole

Preheat oven to 350 degrees.

Cube up about 1/3 to 1/2 a loaf of bread.

(any kind works, homemade, store bought, my personal favorite it the Apple Streusel bread from Costco but I don't buy it very often. A cinnamon raisin bread would be yummy too. Whatever you have on hand.)

Spray a 9x13 inch pan with cooking spray.

Spread the cubes evenly in the pan.


In a separate bowl combine the following:
1 cup sugar
2 cups milk
4 eggs
1 tsp vanilla
1 tsp cinnamon
1/4 tsp nutmeg

Whisk together like this:

Pour milk/egg mixture over the bread trying to cover most of the bread cubes.
Sprinkle 1/2 cup chopped nuts over the bread.

Bake for 45-50 minutes.
Remove and let cool slightly before serving.

We like it with a little maple syrup drizzled over the top and some fruit on the side. Maybe a little hot chocolate too.

Sooooo Yummy!

Print It Button