Tuesday, April 30, 2013

A Gloria High-Low Refash

 
I picked up this Gloria Vanderbuilt Dress at the thrift store for $1 on my latest trip.  
I liked the subtle print and drape to the fabric. 
Originally I thought it would be a cute high-low dress and there would be enough left to from cutting the high part to make sleeves and a casing for ties just below the bustline, but alas there wasn't.  

I do still want to make a dress like that, it just won't be today.  

So it ended up a just a simple high-low skirt.  
Still summery and cute.  
Super easy to do.


The dress is simple and plain.  

Ok. 
Just not really what I'm looking for.

So let's start chopping.

First I cut off the hemline.  
Remember the ties for the bustline?  
They were still an option in my head at this time.


Next I laid out the dress folding it so that the side seams meet in the middle and the fold line is in the front and back.  Next figure out how high the 'high' part will be and mark it with a pin.


Then just cut a wedge out sloping down from the high point to the bottom edge.


Here's what it looks like from the front.  Trim the cut line if necessary to make an even edge.


At this point I realized my original plan was not to be, so I chopped the dress off at the bustline.


Then just add an elastic waistband. I double top stitched it this time.  It just looks more professional.


Then I serged and hemmed the bottom edge.  Serging or zig-zag-ing the bottom edge will help the hem to be more easy to work with and fold nicely.


Here's the finished high-low skirt.  Easy Peasy.


Fun, flirty, and summery.
You'll notice I'm not wearing shoes.  For some odd reason, I don't have any to match this skirt.
Darn it.  I'll have to go shoe shopping.
I know you can tell I'm so distraught about it.

I've been eyeing these over at 6pm.  What do you think?  Yes? or No?


Monday, April 29, 2013

A Modest Mossimo Refash


I'm a follower of Refashionista.  
I love seeing what kind of pretty things she can make out of something that only cost $1. 
When I first found her blog, I wondered, "How is she finding these pieces for only $1?"  
Until I discovered that my local thrift store does $1 days too.  

How did I not know that?  

So now I plan on going regularly to find things I can remake into something cute.  
This week there are 2 items I picked up on a recent thrift store spree that I will share with you.  
They are pretty basic refashions. 
I hope you like them.  
Jillian's modesty level is different than mine however.  
I don't do strapless, or sleeveless, or anything shorter than knee length.  
Partly for religious reasons, partly just cause I'm not comfortable with it.  

When I found this Mossimo dress, I fell in love.  

Plus it was only $1.  

However it only comes to about my mid-thigh.  
And since I don't do the 'wear leggings so I can get away with a super short skirt style' I needed to add some length to the skirt.  

I thought about just cutting it off and making a tunic out of it, which would be easy, but I didn't want to lose the cute pockets in front.  
I also didn't want to just add a piece at the bottom.  
Too obvious that I messed with it.  
I tried different colors of fabric to add for the stripes, and settled on the black. 
You can almost never go wrong with black in my opinion.  

So let me show you how I colorblocked my Mossimo.


Here's the dress before the big refashion.


I layed it out on my cutting table and cut two lines.  One just below the waist, and one just above the hem.


Then I cut 2 - 5 inch strips of black and sewed them to the cut pieces of the dress.  I topstitched each seam to match the rest of the dress.


A little more close up detail.  The top of the black was folded over and seamed to match the placket of the dress. (you know, that part where the buttons go on a garment)


After sewing all the strips together, I knew I didn't want to add more buttons to the skirt where I added the black, and I also didn't want anyone playing pee-a-boo with my legs through the skirt where the buttons should be, so I top stitched the dress together down the placket from the waist to just above the hem line.  The pictures below show where I pinned it in place.


And done.  A modest colorblocked Mossimo dress.


 So cute and it only cost me $1. Super score!


What will you refashion?  I'd love to hear about it!


Saturday, April 27, 2013

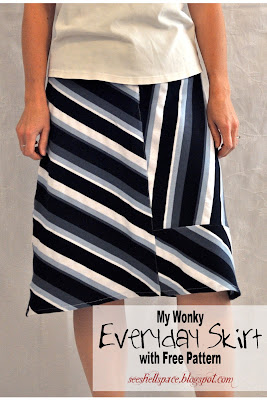
My Wonky Everyday Skirt (with free pattern)


I know I've been kind of on a skirt kick lately.
Like this one, and this one, and this one, and this one 
They are so easy to make and oh so comfortable.  
Especially as the thermometer starts climbing again.  
I'm an Arizona girl after all.  

It gets dang hot here during the summer.  
And while I would love to go back to Seattle to live, I have decided the difference between here and there is they get 3 months of nice weather, and 9 months of crappy weather.  
Here in Arizona we get 9 months of nice weather, and 3 months of crappy hot weather.  

I could so easily become a "snowbird." 
That's what we call older retired people who come here for the winter.  
But I could spend my summers in Seattle and winters here.  

That would be heaven.  

But since that's not possible right now, I have to make the best of my wardrobe to deal with the heat. 

I'm so in love with the everyday skirt.  
I'm definitely making a lot more.  
Plus whenever I go to SAS I always find some cute fabric that just calls to me. 

Plus I was pleasantly surprised to find this in 
the window display when I got there.  
My stuff!  
So Cool if I do say so myself.


That's what happened with this nautical stripe.  
I loved it as soon as I saw it.  

But when I got looking closer I found these cuts in the fabric.  
It looks like it was folded and someone accidentally cut through several layers at the same time.  

But I wasn't scared and I didn't put it back.  
I can work with that.  
I'm so glad I did.  
I think this may be one of my new favorites.  

I really like the wonky-ness of the stripes.  
Kind of unexpected and fun.  
A little like me.


So lets get started.  I made a pattern for you from the chevron skirt I made before.  I am going to use this pattern again and again.  Once you have it fitted to you, the possibilities are endless.


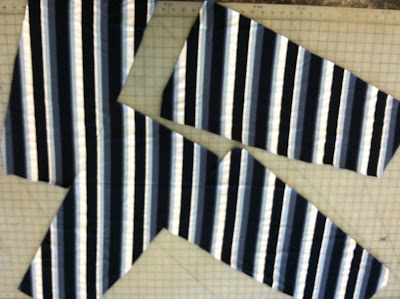
Lay out the fabric and cut individual pieces.  This is what they looked like after cutting and removing the excess.  I pretty much put the pattern wherever it would fit and cut.  I didn't worry about matching up the stripes at all which adds to the wonky nature of the skirt.


I didn't have quite enough to get four full pieces, so I pieced together the last piece.


I sewed the two pieces together, then topstitched them.


Pin the pieces together and seam them.


I top stitched every seam.  More of a finished look.


I added a simple elastic waistband to the skirt.


Serged then topstitched.  Done!


 Perfect for running errands, cleaning, or just about anything.


I tried it with my t-shirt scarf and it actually works.  Dress it up or down depending on the occation.


My Wonky Skirt.
Fun, Summery, and super easy!


Thursday, April 25, 2013

It was an Amazing Race! (Teen Birthday Party)


It's finally done!  That's why I haven't had time to post regularly. I've been working on this party for my boy who recently turned 16.  The party was awesome, if I do say so myself, but it was a lot of work!  But now I've done most of the work for you, feel free to take my ideas and run with them, or race with them as the story goes.

First I scoured the internet for ideas for an Amazing Race party and found quite a few good ideas, but most of them didn't take care of all the finishing touches.  All the little details that make the party great.  I'm really not trying to brag or anything, but it turned out much better, and a little different then I imagined.

Second, since the original show takes the players all over the globe, I wanted to re-create a little of that.  So I looked through images of flags from around the world.  I chose 12 of the more easier designed flags, pulled out my fabric stash and made flags for each of the countries.

The cut size was 20x30 inches.  They were pieced together and then sewn and roll-hemmed.
I may make them into a quilt someday but I already have a request to borrow them for an upcoming youth activity at church, so the quilt will wait.


The 12 countries I chose were Austria, Belgium, Denmark, France, Germany, Ireland, Netherlands, Italy, Spain, Switzerland, Sweden, and Japan.  My husband asked why I chose the countries I did when we were making up the location clues and I said just by the flag design.

I went to Goodwill and found 3 different color sheets for $1 each and ripped them up in to bandana size.  Each kid got a bandana in their team color to wear the rest of the night.  If you look close in the pics you will see them on the kids.  The colors were Blue, Yellow, and Red.

Then I solicited the help from a few of my neighbors to help with the challenges.  I needed locations close by for the kids to go to for each challenge.  I ended up with more volunteers than challenges which was nice.  
There was a total of 8 challenges.  
At each location they hung the flag of that country in the trees outside so the kids could find it easily.

Since my house was the start and finish, I hung a huge American flag above my front door.  
I also ordered globe balloons from Amazon to put out in the front of my house.  
I should have taken pictures of the front but unfortunately, I forgot to.

These are the ones I chose:

1. Become a spy and change your identity. Dress up and have the handler take your picture.  I found a package of mustaches at Party City that were stick on.  They were a must for this challenge.  The boys ended up wearing theirs for the rest of the night.

2. You must put 7 marshmallows in your mouth and say "Chubby Bunny." 
Then eat 7 saltines and whistle 3 notes. 
I only got video from this location, and I know some of the kids would be embarrassed if I posted the video.  
Just use your imagination.  It's really funny!

3. We live by a lake that is surrounded by trees and ducks that swim in the pond.  
So for this challenge they had to each climb a tree, feed the ducks, and count the benches that surround the lake.  It's not that big of a lake so it was relatively easy. 
The pic is my monkey boy in the tree. 
That kid can climb anything, anywhere!


4. The Italy challenge was that they were out of money and needed to get $2.00 in change. 
The problem was that it was mixed in with a large bowl of cold spagetti.  
They had to make the change as a team, while blindfolded.  
One of my personal favorites!


5. One challenge was at a nearby park.
The kids had to slide down the slide, hang upsidedown on the jungle jim, then do underdog on the the swings.  This one was also a pit stop where I gave them water and a mini candy bar.


6. For this challenge there was two tasks.  
One was to separate the M&M's by color and fill in the numbers on the poster board to write 1997, which is my son's birth year.  Then they had to go through a large bowl of pennies and find 3 pennies that were from 1997.


7. For this one they had to unscramble some letters to send a message to my boy.
I totally messed up in cutting the letters and forgot to make a D for Birthday.
Thankfully the kids were smart and improvised for me.


8. The last one was to shoot 3 free throws and throw a football through a hula hoop.  
Pretty easy and basic, but fun at the same time.


I also gave them challenges to do along the way.  
Each one had extra points attached to it.  
One of them was to take a picture of a garden gnome.  Only one team found one.  
The others were to take pictures of license plates other than ones from AZ, take a picture of an animal other than a dog, and take a picture with a random dog walker.  

Each team had a person with a camera phone with them and they texted the pictures to me as they took them.


Now for the details.
I made envelopes that contained the information for each challenge.  It was pretty easy.  I just made the image in photoshop, printed it out on colored paper and folded it into an envelope.


If you use my templates, you will need to cut about an inch off each side of the 8 1/2 by 11 size paper.


Fold in thirds. Then cut about 1/4 inch up on each fold line on the bottom.
Fold this flap up.


Trim the side pieces off like shown. Then get a glue stick and glue the bottom and top flap down.


I notched the top of each envelope so it was easy to pull the challenge card out.


I printed 3 challege cards and envelopes for each challenge so each team got their own.  I gave them to each of my friends with their supplies for their challenge to give the kids when they came.


Each team got a manilla envelope with their team color on it.  Inside was the race map and location clue cards along with the bonus challenge card.


Now for all the free printables I promised.  Each one is a .jpeg that fits an 8 1/2 by 11 size paper.


These are the challenge cards.  I printed these on cardstock.  Since I had 3 teams, there are 3 cards per challenge.


Next are the challenge envelopes.  Print these on 8 1/2 by 11 colored paper and trim like shown above.


Next are the destination clues.  They were made to help the kids get to each country flag at each location.  I gave you a blank one if you would like to make your own.


Finally, the bonus challenges.


I almost forgot.  The invitations.  The first one I printed on yellow paper then used it to make the envelope for the invitations.


This is the stripped down version I used.


And this is the generic version you can use.  Just add your own information to it.


I hope you like what you've seen today and maybe someday do a party like this.  
I'd love to hear about it if you do!
Have an amazing day!


Print It Button