
Ok. I got my Creating Keepsakes magazine in the mail yesterday. I know you probably have had yours for a while and dog-eared a bunch of pages, but I saw a little Christmas tree embellishment on one of the pages and wondered if I could duplicate it in Photoshop. I think mine turned out pretty good. Here's the finished card.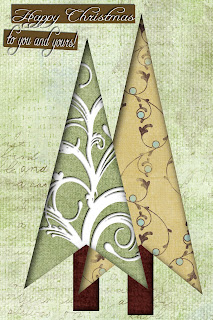

So here is how I did it:
1. Open a new blank document. I made my 4x6 with a white background. Click on your custom shape tool. I chose the arrow shape that kind of looks like a tree. Make sure your color pallet is set to black. Click and drag the shape on your document. Use the Transform tool to resize your 'tree'.
Mine looks like this: Once that is done Left click on the layer and select >Simplify Layer in Elements and >Rasterize Layer in Photoshop CS2,3,4.
 Once that is done Left click on the layer and select >Simplify Layer in Elements and >Rasterize Layer in Photoshop CS2,3,4.
2. Open a new blank document, but make sure the background is Transparent. Choose a brush from your brushes pallet. I chose a couple of swirly ones I got from brusheezy. They have a ton and they are Free. Use the Transform tool to resize and rotate the brushes until they look like what you want. Here's mine: Be sure to 'stamp' each brush on it's own layer so you can move them independently. Once you like the shape, hit Control and click on each layer to select all of them. Then Left click and select Merge Layers.
 Be sure to 'stamp' each brush on it's own layer so you can move them independently. Once you like the shape, hit Control and click on each layer to select all of them. Then Left click and select Merge Layers.
3. Use the paint bucket tool, change the color pallet to white, and click on the shape to fill it with white. Then drag your shape on to the main document with the black tree shape.

4. Now open your cute patterned papers and select a background paper and a paper for the tree. I chose from OScraps Moonrise collection. Sorry but they don't have it on their site right now. But I bet you have a ton of cute paper you are just itching to use. I chose a stripe for the background. Drag it to a layer below the tree layer.

 Do the same with your tree paper.
5. Remember when you used the clipping mask? Hover your mouse between the tree shape layer and the tree paper layer, hit the Alt key, and click. This will magically clip the tree paper to the tree shape. 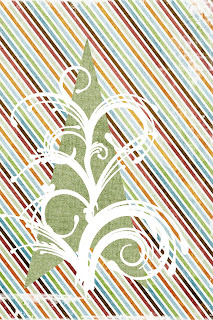

6. Now select the tree shape layer. Go to your Blending Options, or the circle-f key below your layers pallet. Choose Inner Shadow. Play with the settings until you get the look you want. Mind kind of looks like the edges have been inked.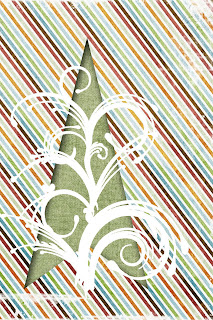

7. Next select the swirly shape layer. Again go to Blending Options. I chose Bevel and Emboss, and Drop Shadow. It looks like this: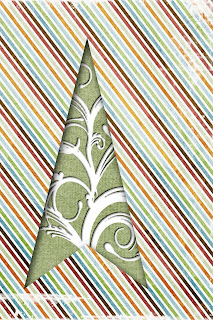 I also used the clipping mask technique to 'clip' the swirly shape to the tree shape so there wasn't any extra swirls hanging off the edges.
 I also used the clipping mask technique to 'clip' the swirly shape to the tree shape so there wasn't any extra swirls hanging off the edges.
8. Open a new layer and select the custom shape tool again. This time choose a rectangle to make the trunk of your tree. Click and drag your rectangle, making sure the layer is under the tree shape layer. 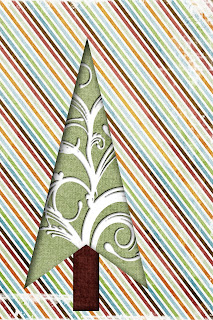 Clip some brown paper to the rectangle using the Alt key again, just like you did with the tree shape. I added the Inner Shadow to the tree trunk shape too.
 Clip some brown paper to the rectangle using the Alt key again, just like you did with the tree shape. I added the Inner Shadow to the tree trunk shape too.
But the stripe is a little too much for me. I don't love it. So this is the cool part of Digi scrapping. I can just drag the stripe layer into the trash. No fuss, no muss, and I didn't waste any expensive paper. I chose another calmer green paper from the same collection for the background. Drag it under your tree to look like this: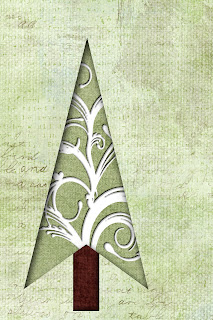

That's better.
9. Now select the tree shape and hit Control+J to create a duplicate layer. I think Elements is a different letter. Check your hot key list to get the right one. Drag it over and resize it using the Transform tool. Do the same thing as with the first tree. Clip a different paper to it with the Alt key. I used Jessica Spragues Home Away From Home collection. It's a great kit and it's also Free! Drag another tree trunk over to the new tree, and follow the same instructions for adding an inner shadow, and clipping paper to the shape.
10. Finally I used the Rectangular Marquee tool to create the text strips at the top of the card. Click and drag your shape, fill it with color, and add a drop shadow. You can separately create 2 of them, or just duplicate the one you created. Then I added 2 lines of text using the Text tool. I use my favorite font: freebooter script. Add a drop shadow or bevel and emboss, and you're done! 

Have fun playing with your digi stuff, and the best part is you can use it again, and again, and again, and again, and again INFINITY!
Way cute, now I just need to try it and see if I can follow directions! Plus I need your help designing a birth announcement for Caleb and then again for our family picture Christmas cards, man this would be a lot easier if we weren't on the top and bottom of the country!
ReplyDeleteIs really nice and would appreciate thank you.
ReplyDeletevery much informative post. thanky youu!!!
ReplyDeleteI admire this post for having excess of knowledge and information.
ReplyDeleteAn impressive share! I have just forwarded this onto a coworker thank you
ReplyDeleteThank YOU for the meal!! But yeah, thanx for spending time.
ReplyDeleteNice post. I learn something totally new and challenging on websites.
ReplyDeleteThank you for writing the valuable article.
ReplyDelete