
I got this idea from http://makeitandloveit.blogspot.com/, but I changed a few things and combined two of her ideas. It turned out so cute and it was nice not to have to buy anything to make it. I already had the shirt, trim fabric, and elastic thread from another project. Here's how I made this dress:

Lay out your shirt on the table, making sure it is perfectly flat.

Next, cut the sleeves out. Don't cut both layers at once. Also cut straight across the top, just below the yolk in the back.
 Cut the bottom straight across too. You will probably want to measure another of your little girls dresses to get the length right. It will be OK to trim off more later if needed.
  I also removed the extra buttons that are sewn on the inside at the bottom for use on another project. You can remove the pocket on the front if you wish. My shirt fabric was woven too loosely for me to pick out the pocket without ruining the fabric so I left the pocket on.
 Next lay out the sleeves. I cut about an 1 1/2 inch strips out of the longest part of the sleeve. This is used as the casing, or trim for the edges of the sleeve. Cut several just in case.

 After cutting some 1 1/2 inch strips of my contrast fabric, now we are ready to start sewing. If you don't have any contrast fabric, use some of the sleeve trim you cut here. I don't pre-iron my trim, but you can if you want. Lay the right side of the trim on the wrong side of the fabric. I know it feels wrong, but trust me. It will look great when you are done.
 Sew a regular seam along the top edge of the shirt from sleeve hole, to sleeve hole. Do the same for the back side.

I know this picture is a little fuzzy, sorry about that, but when it is opened up it will look like this.

Now you will fold the trim fabric twice. A quarter of the way over, and then in half. Kind of a tuck and roll. Pin it in place and then stitch it down. You are sewing on the right side of the fabric.

Just keep tucking and rolling the fabric as you sew.
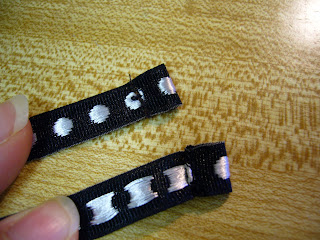
 This is what it looks like when the trim is sewn down.
Now for the fun part. Take your bobbin thread out. Find an empty bobbin, or take of the last remaining thread off an almost empty one. I used some elastic thread that I found at Hobby Lobby. You can probably find it at any fabric store. Hand wind the elastic thread on your bobbin and don't pull it too tight. Put it back in your machine, and widen the stitch length. Now sew across the top right side of your dress. The first row will look like this.

This is what it looks like after about 8 rows. Pull the fabric as flat as you can as you sew each row. It's looking super cute. Do this for both of the top sides from arm hole to arm hole.
 I trimmed the sides down about 1-2 inches. I should have done more. The dress drowned her. But the finishing steps are the same. After I get it fixed, I'll post a pic of her in it.
 Now do the same tuck and roll with the left over sleeve strips along the sleeve opening. I used my serger, but a straight stitch will be fine.
Before we finish the trim on the arm hole, I cut 4 12 inch lengths of cute ribbon for the ties. Lay the ribbon inside the trim at the top edge and stitch down to finish the edge and have the ribbon attached for the ties. Sorry I don't have a picture of that. It's kind of tricky. If you get stuck, send me a message and I will try to help.
Then I folded the end of each ribbon twice and stitched it down to prevent the ends from fraying.

I'm all about multi-tasking. What mom isn't right? So here's a way to add a hem and a decorative edge all at once. Fold the wrong side of your bottom edge over twice to form the hem, and pin in place from the front side. Now lay your ribbon, or other trim on the right side, right along the top of the hem. Now stitch the trim down. I did 2 seams along both sides of the ribbon to keep it flat. Yeah! we saved a step! and you are done!
Good luck with your recycled project!
Here's some pictures of my little girl in another dress I made for her using the exact same steps as above, minus the arm holes. The fabric was a simple rectangle, made into a tube, and added the elastic thread and trim.
She loved it!

 I love the cute smocked look! It's soo easy and cheap to do.
 This is the bottom edge with the contrast trim and hem all at once! Gotta love it!
I love that you mentioned resourceful...that's a great compliment in my blog! Thanks for the useful blog.Keep up your good work.
ReplyDeleteMen T Shirts